源于前端时间安装hadoop 后的一些工作
月度归档:5月 2012
HTTP 协议
一、HTTP 协议特点
- 支持客户端/服务器模式
- 客户端请求时,只需发送请求方式和路径,请求的方法有GET/HEAD/POST 等方式
- HTTP 允许传输任何类型数据对象。正在传输的数据类型为Content-type 定义
- 无连接,每次连接仅处理一个请求,Server 处理完Client 的请求,收到Client 的回复后断开连接
- 无状态,对于事务处理没有记忆能力
Python 之ConfigParser
一、ConfigParser简介
ConfigParser 是用来读取配置文件的包。配置文件的格式如下:中括号“[ ]”内包含的为section。section 下面为类似于key-value 的配置内容。
1: [db]
2: db_host = 127.0.0.1
3: db_port = 22
4: db_user = root
5: db_pass = rootroot
6:
7: [concurrent]
8: thread = 10
9: processor = 20
中括号“[ ]”内包含的为section。紧接着section 为类似于key-value 的options 的配置内容。
二、ConfigParser 初始工作
使用ConfigParser 首选需要初始化实例,并读取配置文件:
1: cf = ConfigParser.ConfigParser()
2: cf.read("配置文件名")
三、ConfigParser 常用方法
1. 获取所有sections。也就是将配置文件中所有“[ ]”读取到列表中:
1: s = cf.sections()
2: print 'section:', s
将输出(以下将均以简介中配置文件为例):
1: section: ['db', 'concurrent']
2. 获取指定section 的options。即将配置文件某个section 内key 读取到列表中:
1: o = cf.options("db")
2: print 'options:', o
将输出:
1: options: ['db_host', 'db_port', 'db_user', 'db_pass']
3. 获取指定section 的配置信息。
1: v = cf.items("db")
2: print 'db:', v
将输出:
1: db: [('db_host', '127.0.0.1'), ('db_port', '22'), ('db_user', 'root'), ('db_pass', 'rootroot')]
4. 按照类型读取指定section 的option 信息。
同样的还有getfloat、getboolean。
1: #可以按照类型读取出来
2: db_host = cf.get("db", "db_host")
3: db_port = cf.getint("db", "db_port")
4: db_user = cf.get("db", "db_user")
5: db_pass = cf.get("db", "db_pass")
6:
7: # 返回的是整型的
8: threads = cf.getint("concurrent", "thread")
9: processors = cf.getint("concurrent", "processor")
10:
11: print "db_host:", db_host
12: print "db_port:", db_port
13: print "db_user:", db_user
14: print "db_pass:", db_pass
15: print "thread:", threads
16: print "processor:", processors
将输出:
1: db_host: 127.0.0.1
2: db_port: 22
3: db_user: root
4: db_pass: rootroot
5: thread: 10
6: processor: 20
5. 设置某个option 的值。(记得最后要写回)
1: cf.set("db", "db_pass", "zhaowei")
2: cf.write(open("test.conf", "w"))
6.添加一个section。(同样要写回)
1: cf.add_section('liuqing')
2: cf.set('liuqing', 'int', '15')
3: cf.set('liuqing', 'bool', 'true')
4: cf.set('liuqing', 'float', '3.1415')
5: cf.set('liuqing', 'baz', 'fun')
6: cf.set('liuqing', 'bar', 'Python')
7: cf.set('liuqing', 'foo', '%(bar)s is %(baz)s!')
8: cf.write(open("test.conf", "w"))
7. 移除section 或者option 。(只要进行了修改就要写回的哦)
1: cf.remove_option('liuqing','int')
2: cf.remove_section('liuqing')
3: cf.write(open("test.conf", "w"))
四、其他
- 以 # 和 ; 开头的行将作为注释
Debian 安装
之前在vmware 上安装的Debian 系统因为分区空间太小,重启系统的时候无法进入图形节点,startx 也只能打开twm 管理器。用vmware-vdiskmanager 扩容vmdk 提示有问题,就只有重装了,借鉴之前出现的问题有几点建议给在虚拟机上装Debian 的建议:
- 不要装Debian 了,改投ubuntu 吧
- 给虚拟机磁盘容量大点吧
- home root 都不要单独分区了,整一个分区吧
- 不要选择“split virtual disk into multiple files”,这样在vmdk 会被切分2GB 一个文件,扩展似乎有问题
废话少说,做好笔记来装机:
下载系统安装包
有两个选择:1. 在官网上http://www.debian.org/ 。2.在163 镜像上下载http://mirrors.163.com/
可能你会在选择CD image 的遇到是 amd64、ia64、i386 的选择,做个说明:
amd64 和ia64 都是64 位系统,ia64 较新需要主机支持安腾架构,一般下amd64 即可
i386 针对的是比较老的一些32 位机器
VMware 安装Debian
VMware 上的new virtual machine 等balabala 的就不说了,中间忽略的过程你可以认为选择默认
- 【install】、【graphic install】 随你选,还是图形的好看点吧
- 【select a language 】这是安装过程中的语言,母语没得说
- 【地区】“中国”,【键盘】“美国英语”
- 【配置网络】主机名:看着办吧!别和现有的网络重名了,建议和虚拟机名相同
- 【设置用户和密码】你会先输入root 的密码,这也就是你之后sudo 要输入的密码,接着建一个自己喜欢的用户名吧!
- 【磁盘分区】如果你知道自己干什么,并且你的磁盘够大,那么选择“手动”吧,图简单“使用整个磁盘–配置LVM”
- 【磁盘分区】“将所有文件放在一个分区中”然后“继续”…
- 【磁盘分区】“如何使用此分区”中选一个你喜欢的,选择ext4 “继续” “分区设定结束”“分区设定结束并将修改写入磁盘”“是”
- 【配置软件包管理】“中国”
- 【配置软件包管理器】三选一 mirrors.geekbone.org、www.anheng.com.cn 、cdn.debian.net 建议选择第三个。HTTP 代理一般也不用吧~
- 【配置软件包管理器】然后就是漫长的下载安装过程,一刻钟左右(看网速)
- 【软件选择】看着喜欢选
- 【正在设定man-db】将GRUB 启动引导器安装到主引导记录(MBR)上吗?(如果不是虚拟机且不止一个OS 请选否)
- 【结束安装进程】继续重启咯
安装系统后的工作
1. 配置网络,配置文件 /etc/network/interfaces /etc/resolv.conf 记得最后要/etc/init.d/networking restart
auto eth0 #开机自动激活
iface eth0 inte static #静态IP
address 192.168.0.56 #本机IP
netmask 255.255.255.0 #子网掩码
gateway 192.168.0.254 #路由网关
# iface eth0 inet dhcp 如果是自动获取的
2. 这时候的字体可能比较难看,背景也不是我想要的“星球”系列,桌面右键“更改桌面背景”字体可修改
3. 更新源文件,配置文件/etc/apt/sources.list ,更新为:
deb http://mirrors.163.com/debian squeeze main non-free contrib
deb http://mirrors.163.com/debian squeeze-proposed-updates main contrib non-free
deb http://mirrors.163.com/debian-security squeeze/updates main contrib non-free
deb-src http://mirrors.163.com/debian squeeze main non-free contrib
deb-src http://mirrors.163.com/debian squeeze-proposed-updates main contrib non-free
deb-src http://mirrors.163.com/debian-security squeeze/updates main contrib non-free
deb http://http.us.debian.org/debian squeeze main contrib non-free
deb http://non-us.debian.org/debian-non-US squeeze/non-US main contrib non-free
deb http://security.debian.org squeeze/updates main contrib non-free
【可选】还有一个方法更新源信息,通过安装apt-spy ,通过其更新软件包列表:
首先 apt-get update 再安装apt-spy
apt-get install apt-spy
使用apy 获取镜像服务器列表
apt-get update
然后使用apy 镜像服务器速度,更新sources.list
apt-spy -d stable -a Asia
4. 接着apt-get update 接着apt-get upgrade 一下吧
5.安装基本的编辑工具吧!(在虚拟机中只有装了gcc 才能安装vmware-tools)
apt-get install gcc
apt-get install make
apt-get install automake
6. 每次输入sudo 都要输入密码是不是很麻烦呢?修改/etc/sudoers 在输入sudo 命令的时候不要输入密码
在最后一行添加:
root ALL=(ALL) ALL #让用户可以使用root 用户的权限
xxxxxx ALL=(ALL)NOPASSWD: ALL #所有用户都不用输入密码
xxxxxx 是你的用户名,最后chmod u -w /etc/sudpers 去掉写权限
大功告成,还要什么自己添加、修改去吧!
python 的双下划线
“单下划线”“_”开始的成员为保护成员,只有类对象和子类对象可以访问到这些变量/方法。
“双下划线”“__”开始的是私有成员,只有类对象能够访问,子类对象都不可以访问。
“from xxx import ”不可以导入“_”开始的变量/方法
私有变量/方法在代码生成前会被转化成为长格式(变为保护类型),转换机制为:变量/方法前加上类名,再将前端加上下划线字符。
比如A 类中有方法和变量 __private 会在代码解释前替换为 _A__private(类似于C 中的宏替换)
上面的如果明白了,可以到这里测试下。
“__xxxx__”这类双下划线开始,双下划线结束的变量为python 特殊变量,常见的有“__name__”“__file__”“__loader__”“__package__”。如果一个文件是作为主程序调用的,其值就会设为__main__,如果是作为模块被其他文件导入,它的值就是其文件名,常可用于模块内置测试。在python 的官方文档中有这样的解释:
The special global variables __name__, __file__, __loader__ and __package__are set in the globals dictionary before the module code is executed (Note that this is a minimal set of variables – other variables may be set implicitly as an interpreter implementation detail).
__name__ is set to run_name if this optional argument is not None, to mod_name + '.__main__' if the named module is a package and to the mod_nameargument otherwise.
__file__ is set to the name provided by the module loader. If the loader does not make filename information available, this variable is set to None.
__loader__ is set to the PEP 302module loader used to retrieve the code for the module (This loader may be a wrapper around the standard import mechanism).
__package__ is set to mod_name if the named module is a package and to mod_name.rpartition('.')[0]otherwise.
If the argument alter_sys is supplied and evaluates to True, then sys.argv[0] is updated with the value of __file__and sys.modules[__name__] is updated with a temporary module object for the module being executed. Both sys.argv[0] andsys.modules[__name__] are restored to their original values before the function returns.
Cuckoo Hash 布谷鸟哈希
布谷鸟哈希最早于2001 年由Rasmus Pagh 和Flemming Friche Rodler 提出。该哈希方法是为了解决哈希冲突的问题而提出,利用较少计算换取了较大空间。名称源于该哈希方法行为类似于布谷鸟在别的鸟巢中下蛋,并将别的鸟蛋挤出的行为。它具有占用空间小、查询迅速等特性,可用于Bloom filter 和内存管理。
算法描述
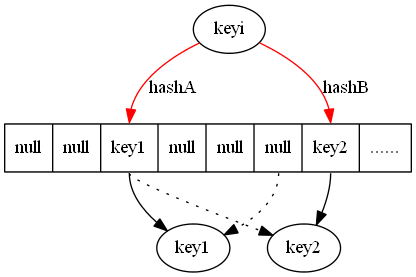
算法使用hashA 和hashB 计算对应key 的位置。
- 当两个哈希任意位置为空,则选择一个位置插入
- 让两个哈希有位置为空时,则插入到空位置
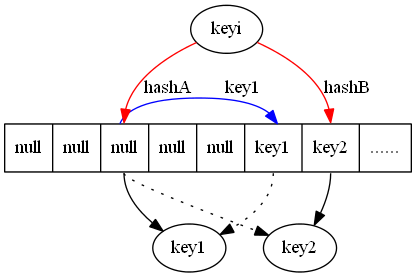
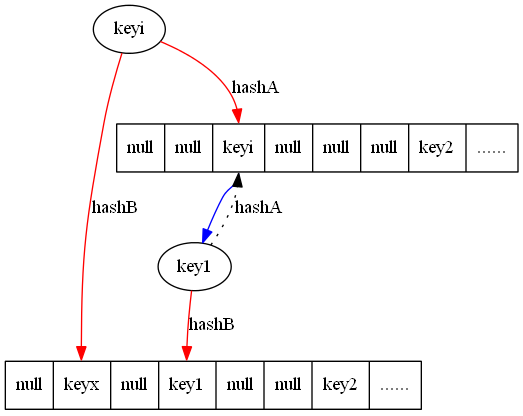
- 当两个哈希位置均不为空时,随机选择两者之一的位置上keyx 踢出,计算踢出的keyx 另一个哈希值对应的位置进行插入,转至2执行(即当再次插入位置为空时插入,仍旧不为空时,踢出这个keyy)
图例
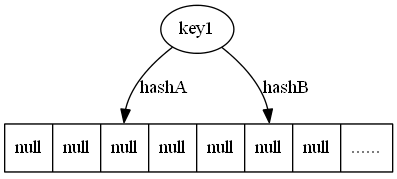
1. 插入key1 两个位置均为空,则插入任意位置.
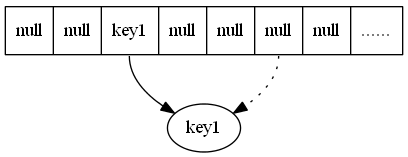
2. 插入后
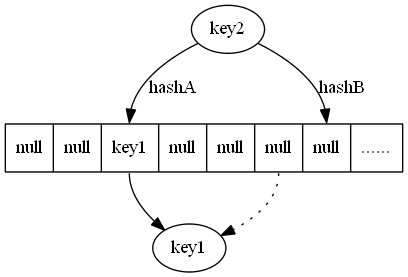
3. 插入key2 两个位置有一个位置为空,则插入空的位置中
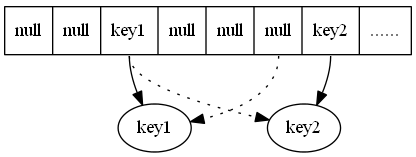
4. 插入后效果
5. 新插入keyi 发现对应两个位置均被占据
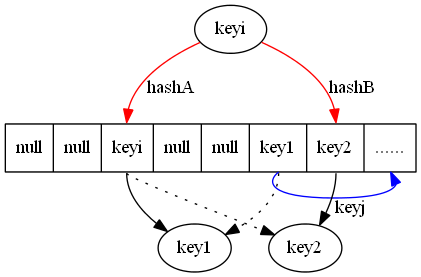
6. 随机选择一个位置提出所在位置的key(key1),将踢出的key 放置在另一个哈希结果对应的位置上
7. 如果踢出的key(key1)又占据/踢出了其他key(keyj)的位置,则反复执行上面的过程直到结束
其他
- Cockoo hash 有两种变形。一种通过增加哈希函数进一步提高空间利用率;另一种是增加哈希表,每个哈希函数对应一个哈希表,每次选择多个张表中空余位置进行放置。三个哈希表可以达到80% 的空间利用率。
- Cockoo hash 的过程可能因为反复踢出无限循环下去,这时候就需要进行一次循环踢出的限制,超过限制则认为需要添加新的哈希函数。
- 在SOSP 11 的SLIT 文章中有使用Cockoo hash。
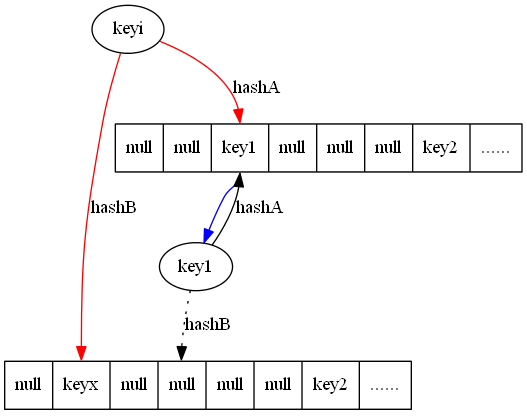
增加哈希表过程如下:
当新插入一个key hashA 在上面哈希表位置和hashB 在下面哈希表的位置分别被key1 和keyx 占据,任选一个key 提出(这里选择key1)。
计算key1 hashB 的值然后插入到下面的hashB 对应的哈希表中。
PS
文中图使用graphviz 绘制,图例第七张图片生成文件如下:
1: digraph G {
2: "node0" [
3: label = "<f0>null | <f1>null | <f2>keyi | <f3>null | <f4>null | <f5>key1 | <f6>key2 | <f7>......"
4: shape = "record"
5: ];
6:
7: "node2"[
8: label="key1"
9: ];
10:
11: "node3"[
12: label="key2"
13: ];
14:
15: "node1"[
16: label="keyi"
17: ];
18:
19: "node1"->"node0":f2[color="red",shape="record",label="hashA"];
20: "node1"->;"node0":f6[color="red",shape="record",label="hashB"];
21:
22: "node0":f2->;"node2";
23: "node0":f5->;"node2"[style="dotted"];
24:
25: "node0":f2->;"node3"[style="dotted"];
26: "node0":f6->;"node3";
27:
28: "node0":f5:s->;"node0":f7:s[color="blue",shape="record",label="keyj"];
29: }
在GVEdit 在使用的时候,F5 是生成图片,并在对应的目下生成了响应的图形文件,相关设置在Graph setting 里面,第一次用的时候总是找不到export image 的方法,总导出不了对应图片。
